How To Configure Label Printing
PDM includes the facility for printing bag/box labels for orders.
The system supports printing to dedicated label printers as well as to standard printers that can handle sheets with multiple labels.
This facility has been tested on the latest versions of Internet Explorer and Google Chrome web browsers using the Zebra GK420d label printer. Though we have not tested the functionality on other label printers and web browsers if the directions in the guide are followed.
Printing to a dedicated label printer
1. Configure the printer driver
It is essential that this step is followed to avoid having to set the printer's preferences each time you print a new label. This step allows the printer driver to override the printing defaults set by the web browser.
1. Locate the label printer in your computer's control panel for printers.
2. Right-click on the printer icon and choose "Printer Properties."
3. Click on the "Printer Settings" tab.
4. Tick the box next to the "Always use drivers settings" option under "Override Application Default Settings."
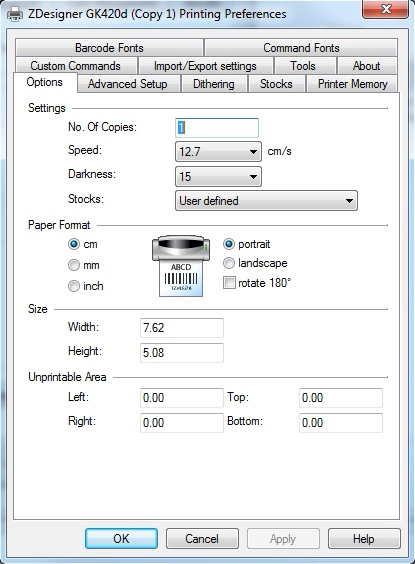
5. Click on the "General" tab, then click on the "Preferences..." button.
6. Ensure that the "Width" and "Height" figures under "Size" on the "Options" tab match the size of the labels you are using in the machine. Usually, the defaults are correct. We recommend that you try using the defaults even if the default height specified does not match the size of the labels. You can adjust these later if needed.
7. Set the "Left" "Top" "Right" and "Bottom" figures under "Unprintable area" to 0.
8. Click the "OK" buttons to save the changes to the printer driver settings.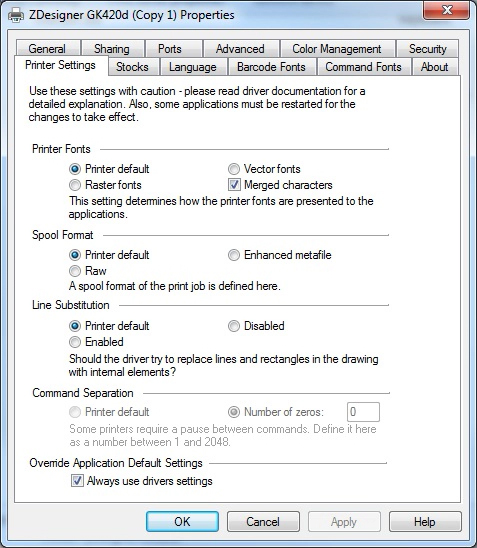
2. Configure the label settings in PDM Web
The window shown below is displayed each time you attempt to print a label in PDM Web. Please follow the instructions below to ensure the correct settings for your printer. Please note that these settings are saved for each user, so do not have to be reset each time.
Sheet width and Sheet height - These should be set to the width and height of the individual labels on the roll.
Label width and Label height - These should be set to the width and height of the individual labels on the roll, so should match the Sheet width and Sheet height above.
Text size - We recommend a figure between 8 and 10. You may need to use smaller text sizes if the print isn't fitting on the size labels you are using.
Label padding - we recommend that you start with padding of 5 mm on all sides, but you may need to adjust this depending on the labels that you use to get the print to sit right on the label.
Labels per page - set this to 1. However, if you find that your printer prints a blank label after every printed label, you may need to set this to a very high number such as 9999.
Printing to a standard laser/inkjet printer
The window shown below is displayed each time you attempt to print a label in PDM Web. Please follow the instructions below to ensure the correct settings for your printer and paper type. Please note that these settings are saved for each user, so do not have to be reset each time.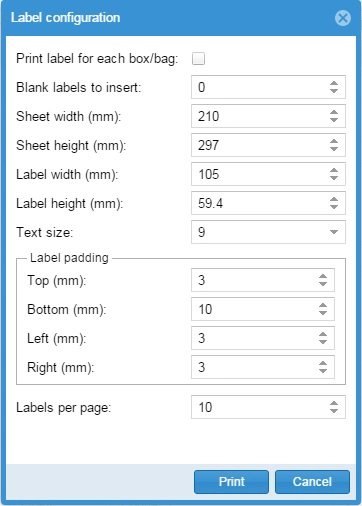
Sheet width and Sheet height - these should be set to the width and height of the paper sheet that the labels are attached to. In most cases this will be A4 size (210 x 297 mm)
Label width and Label height - these should be set to the width and height of the individual labels on the sheet.
Text size - we recommend a figure between 8 and 10. You may need to use smaller text sizes if the print isn't fitting on the size labels you are using.
Label padding - we recommend that you start with padding of 5 mm on all sides, but you may need to adjust this depending on the labels that you use to get the print to sit right on the label.
Labels per page - set this to the number of labels on the sheet being used. However, if you find that your printer prints a blank sheet between each sheet when printing multiple labels, you may need to set this to a very high number such as 9999.
Notes on printing from Google Chrome web browser
When printing labels from Google Chrome, you will see a window like the one below: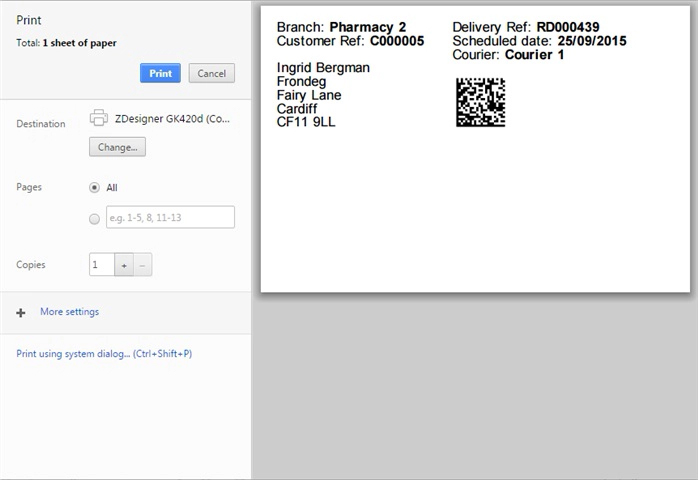
Click on the "More settings" option and check that the Paper size is set to "User defined" and the Margins are set to "None."
Notes on printing from Internet Explorer web browser
There is an additional step needed when printing to a dedicated label printer from Internet Explorer. This only needs to be done once.
1. Print a test label to your label printer after following the steps above. If the label does not print correctly, then complete the following steps. Note: you must print a test label first for the following steps to work.
2. From the "Tools" menu (usually found under the cog icon in the top right corner of the browser) choose "Print" then "Page setup..."
3. In the "Page Setup" window set the following options:
- Page size: "User defined"
- Portrait
- Ensure that "Enable Shrink-to-Fit" is NOT ticked
- Set all margins to 0
- Set all drop-down options under "Headers and Footers" to "-Empty-"
4. Click the "OK" button to save the changes.
See also...