Watch the Video
Creating Orders
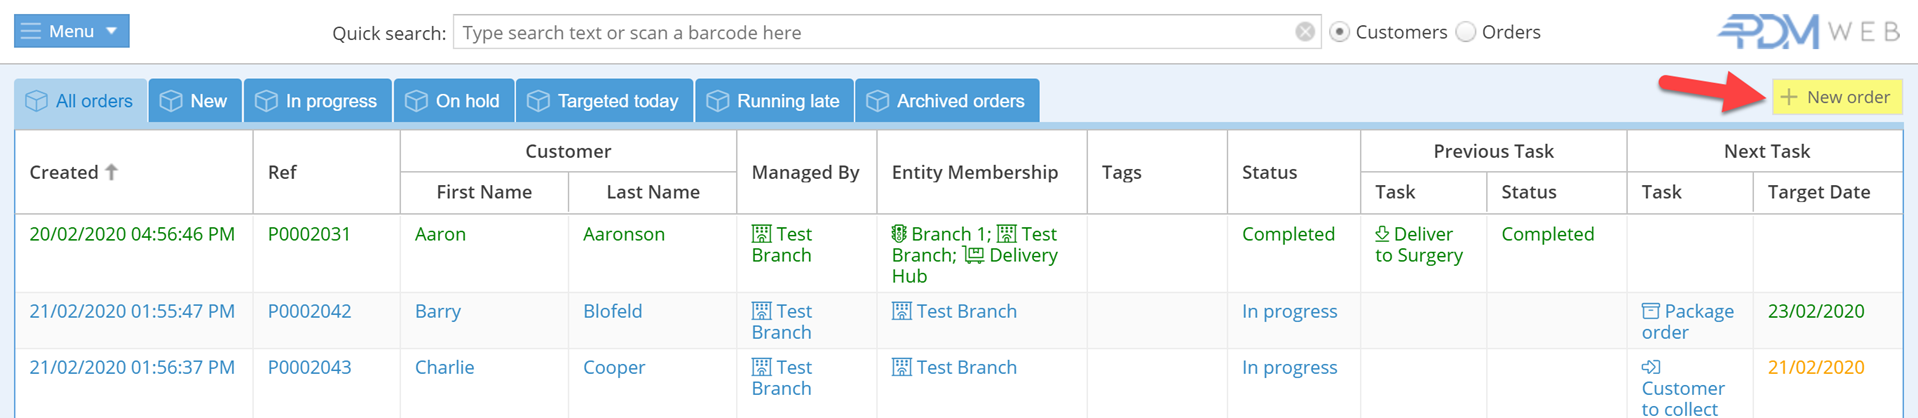
To create an order, the easiest way is to open the Orders module from the main menu and click on the yellow + New order button in the top right corner.
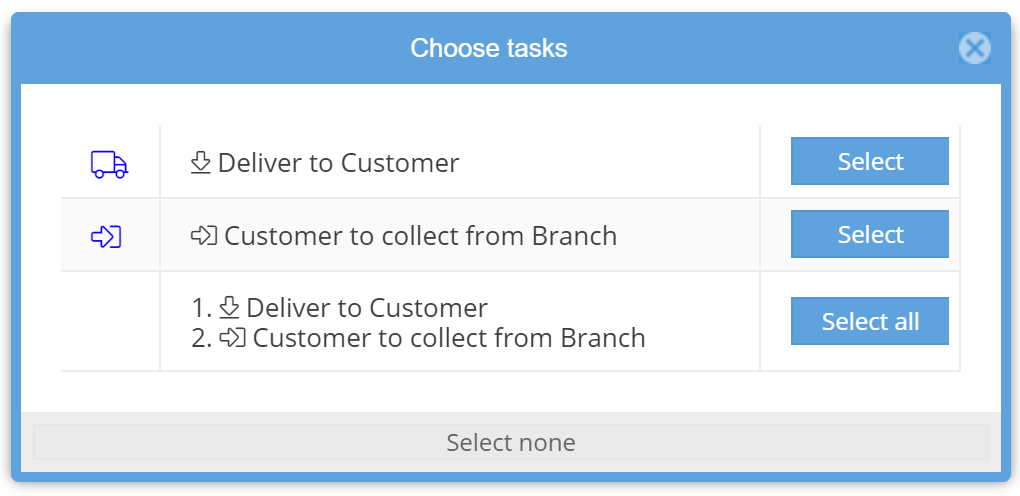
The New order screen will appear. If the customer has multiple tags with associated default tasks, choose which tasks to assign for this order from the options given:
The next screen is the order screen, with a summary of any selected tasks.
It's also possible to create new orders directly from a customer’s information page.

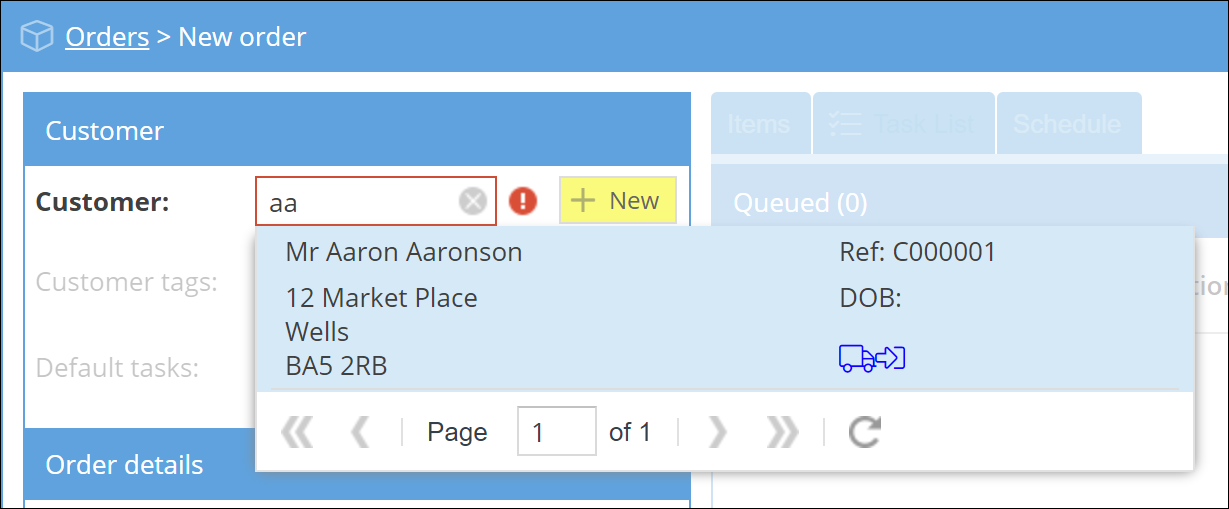
Customer Info
The first step is to confirm which customer the order relates to. When creating a new order from a customer’s information page this section will already be auto-filled with their name and details. Otherwise, either search for an existing customer or create a new one with the yellow + New button.
Pharmacy users will have the option to add payment exemption details or modifying any existing payment exemption.
The next section covers the order details.
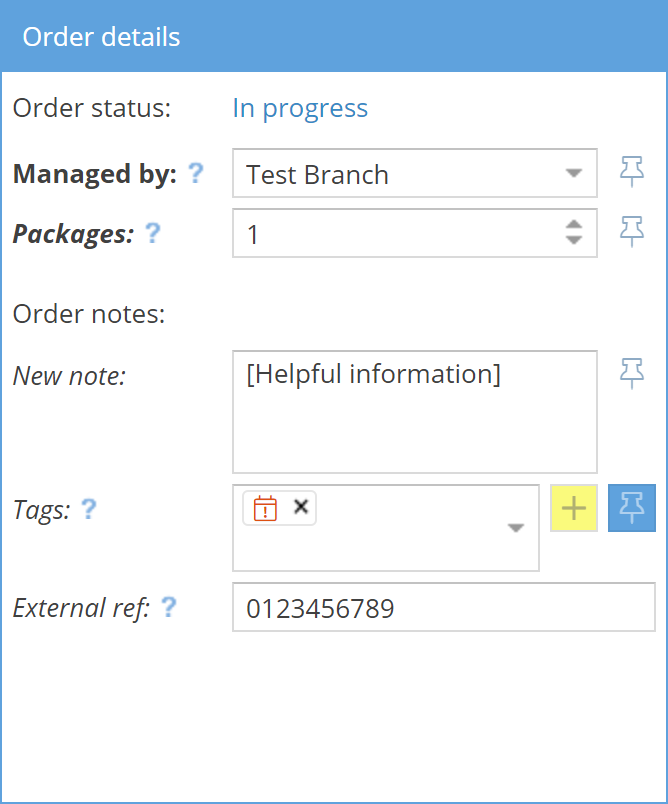
The status will be selected automatically, based on whether this is a new order or an existing order already in progress.
Choose who will be managing this order. Only entities that the customer is a member of can be selected.
Next, confirm how many packages will make up the order.
Optionally add any notes or tags that would be helpful to complete the order, along with any external references that need to be associated with the order.
If a payment exemption has been applied, details will be shown here and the option of removing the exemption from the order will be shown.
Once the customer details have been confirmed, the next window allows confirmation of the order details across three different sections:
- Items - What items will be delivered as part of the order
- Task List - What actions are required to complete the order
- Schedule - Set up a repeating order.
Items
The Items section allows entry of a description of the items that are to be sent as part of the order.
Task List
You also have the option to assign tasks relating to this order to other users using the Task List tab.
This will show any tasks associated with the customer's tags that you've selected. For example, if the 'Delivery service' tag was applied and you selected the 'Deliver to Customer' task, this would be added to the task list and automatically assigned to the 'Couriers' user group (see the Modifying Tasks tutorial for details on changing the default task).
You can add additional tasks using the yellow Add Task button, or you can assign a sequence of different tasks with the yellow Add Sequence button.
Alternatively, delete the default task or sequence by clicking on the bin icon and build the task list from scratch.

Set default tasks are:
- Order reminder
- Package order
- Customer to collect from Branch
- Customer to collect from Hub
- Collect from Branch
- Deliver to Customer
- Collect from Hub
- Deliver to Branch
- Deliver to Hub
- Collect from Customer
Default task sequences are:
- Package, collect from Branch, deliver to Customer
- Package, customer to collect
- Package, transfer from Hub to Branch
- Collect from Branch, deliver to Customer
Create a new task if required.
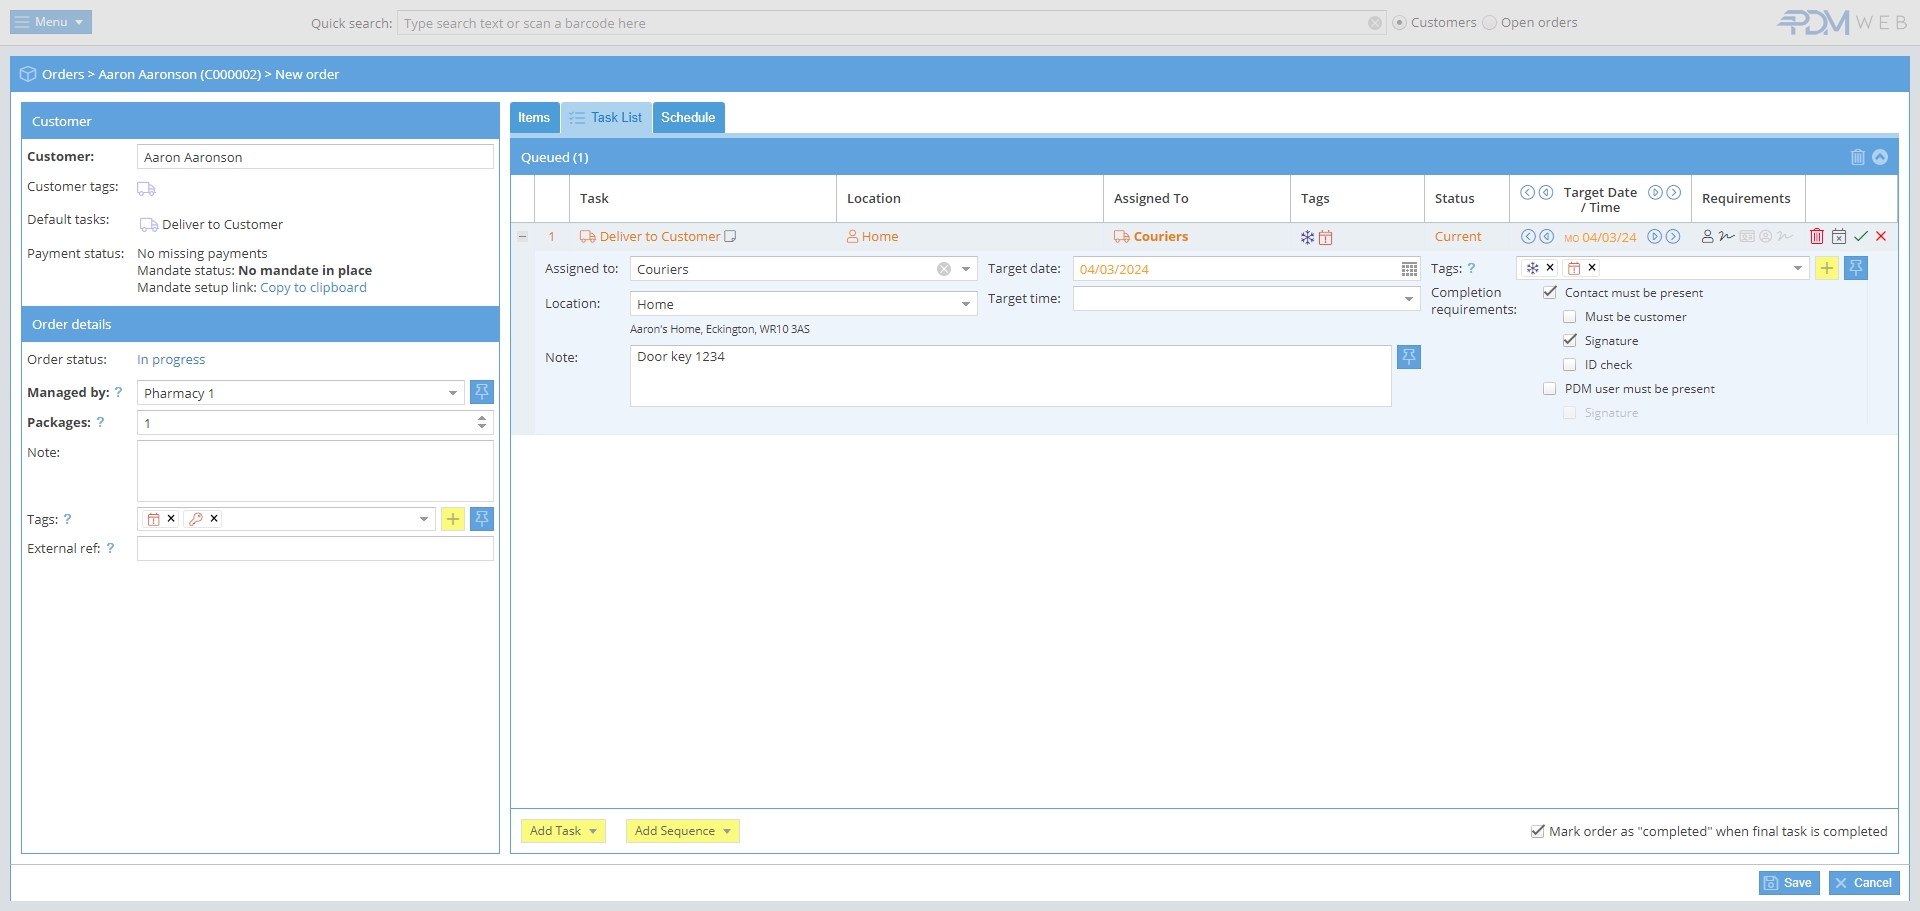
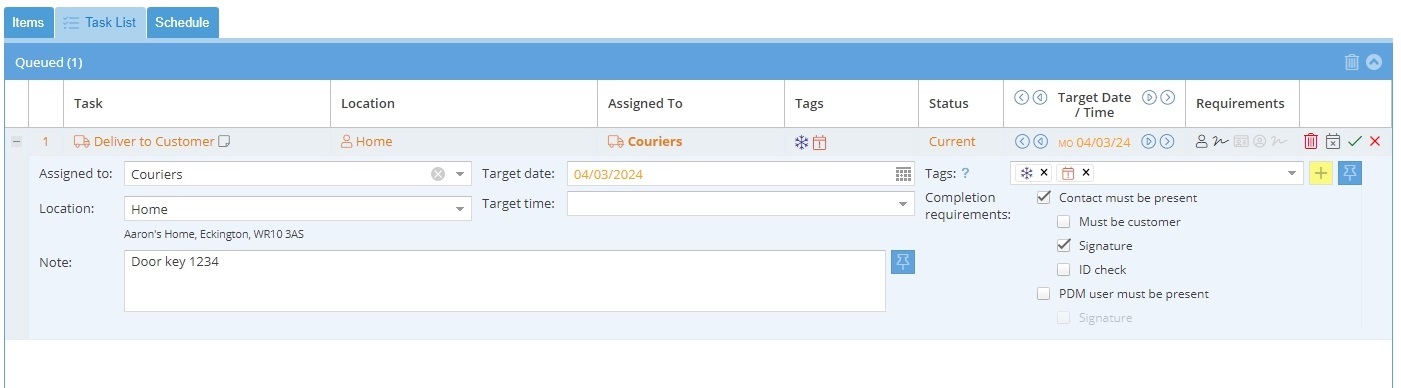
Once one or more tasks have been added, the task list will look something like this:
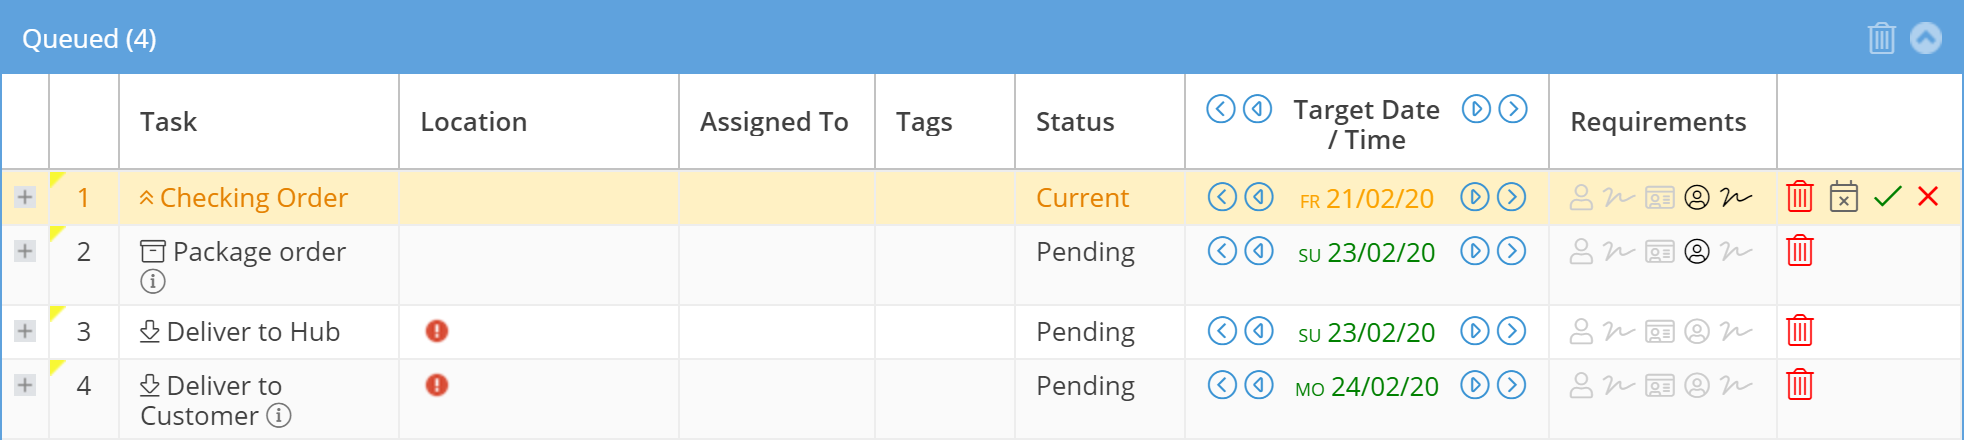
The current task is highlighted in orange. Where additional information is required to carry out the order an alert will appear. Hover over the alert to see what's needed.
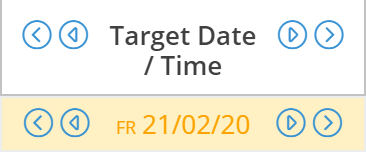
Change the target dates, either for all tasks or on any individual task, by using the arrows at the top of the queue or next to the relevant date to adjust the target date by 1 day/1 week. If 'Sticky task lead times' are enabled, changes to the target dates will be remembered for the duration of the session for that particular task/sequence.
Click and drag anywhere on an entry to move it about and reorder the task list.
Added tasks will be minimised and only show top-level information. Clicking on the + icon expands the task and allows you to fill in the necessary details:
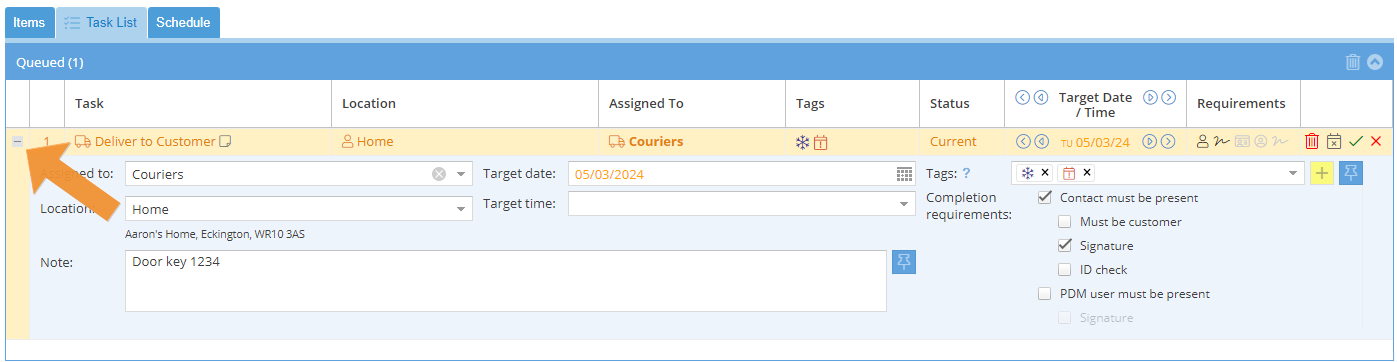
Any task can be assigned to a specific user and location (as long as they’re in the same entities as the customer). If you have ‘Sticky task assignees’ enabled, PDM Web will remember who the specific tasks were assigned to and assign the same person to future tasks created in the same session.
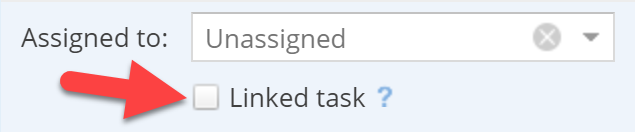
If a user is not assigned to the current task, simply link the task which will mean it is automatically assigned to the person completing the previous task.
Change the target date and optionally set a target time.
Saved default instructions for the task will be automatically included, but additional instructions can be added for this specific order if required.
To the right of the task, you have the option to add any relevant tags that will help staff complete the task.
You can also set your requirements for completing the task:
- Does a contact need to be present (and if so does it need to be the customer)?
- Is a signature or an ID check needed?
- Does a PDM user need to be present and if so, do they need to sign to confirm the step is complete?
Schedule
To set an order to repeat regularly, go to the Schedule tab. When you first open the tab, you’ll see a tick box to confirm whether or not this is a Repeat order.
Tick the box to open up the repeat order options:

Select from the following options:
- Start date (required): When the first order will take place.
- End by date: When the last order will take place. To enable this order to carry on continuously, leave this blank.
- Recurrence pattern: Choose how often the order is to be repeated.
First, decide on how to schedule the Recurrence. Choose between:
- Daily
- Weekly
- Monthly
- Yearly
Then set the exact pattern. For example, if a daily recurrence has been chosen, choose a pattern of:
- Every X Days (where X is a user-defined number of days)
- Every Weekday (for orders to be repeated Monday to Friday)
- Every Weekend Day (for orders to be repeated Saturday and Sunday)
Each recurrence has its own pattern options, which allows users to schedule orders in the exact way that suits them.
Viewing a preview of the repeating order will show you a summary of the orders that will be generated.
Finally, confirm whether or not the schedule is active by ticking the box labeled Active.
Completing the order
Finally, once all the necessary information has been added, it’s time to save the order.
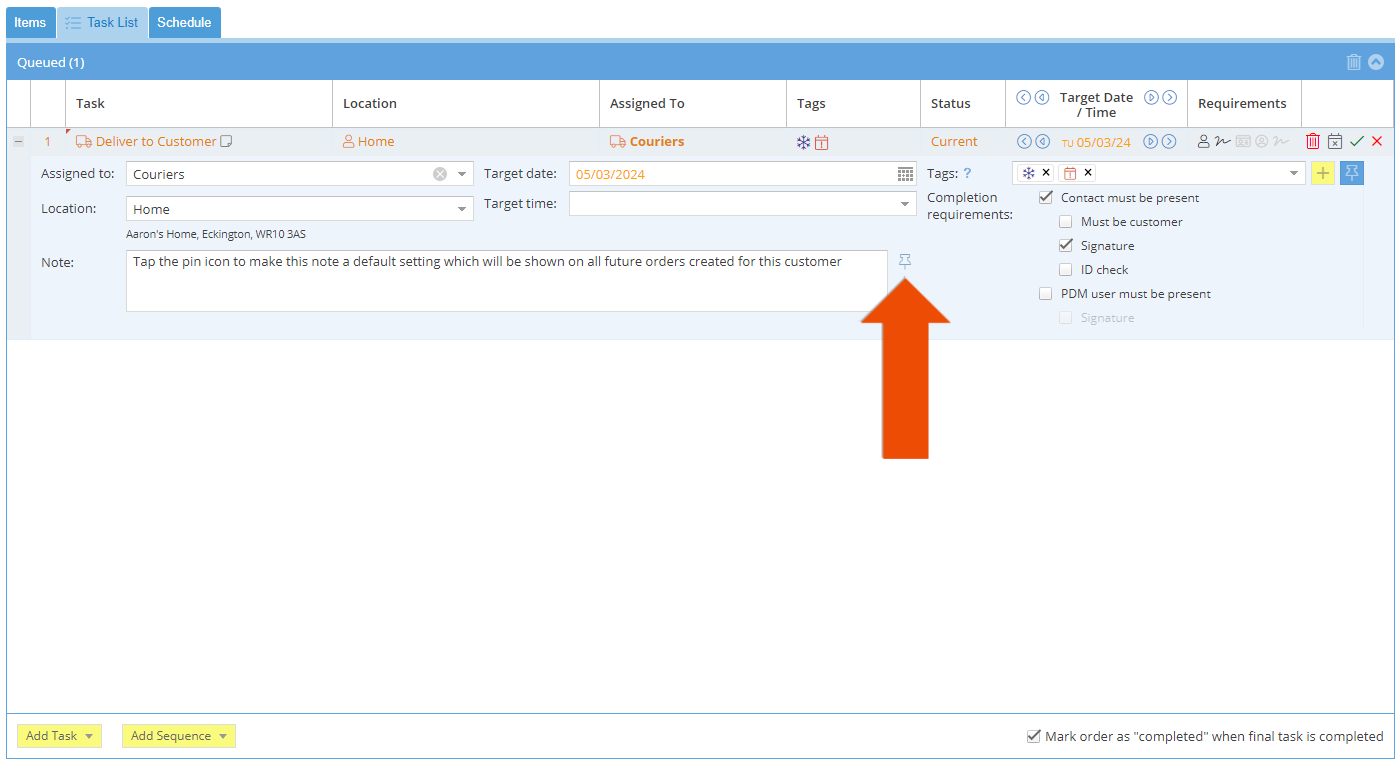
If you want to save any of the order details (including order details, order items, and task configuration) as defaults for future orders for this customer, tap the pin icon 📌 next to the specific details that are to be remembered.
Once the order is ready and any default information is saved (‘pinned’), use the button at the bottom of the screen to Save the order. This will add the order to the system.
Alternatively, Cancel the order.
Once an order is saved, three new options will be shown: Cancel order..., PDM Portal, and Print labels....

For details on cancelling an order, see the Modifying Orders tutorial.
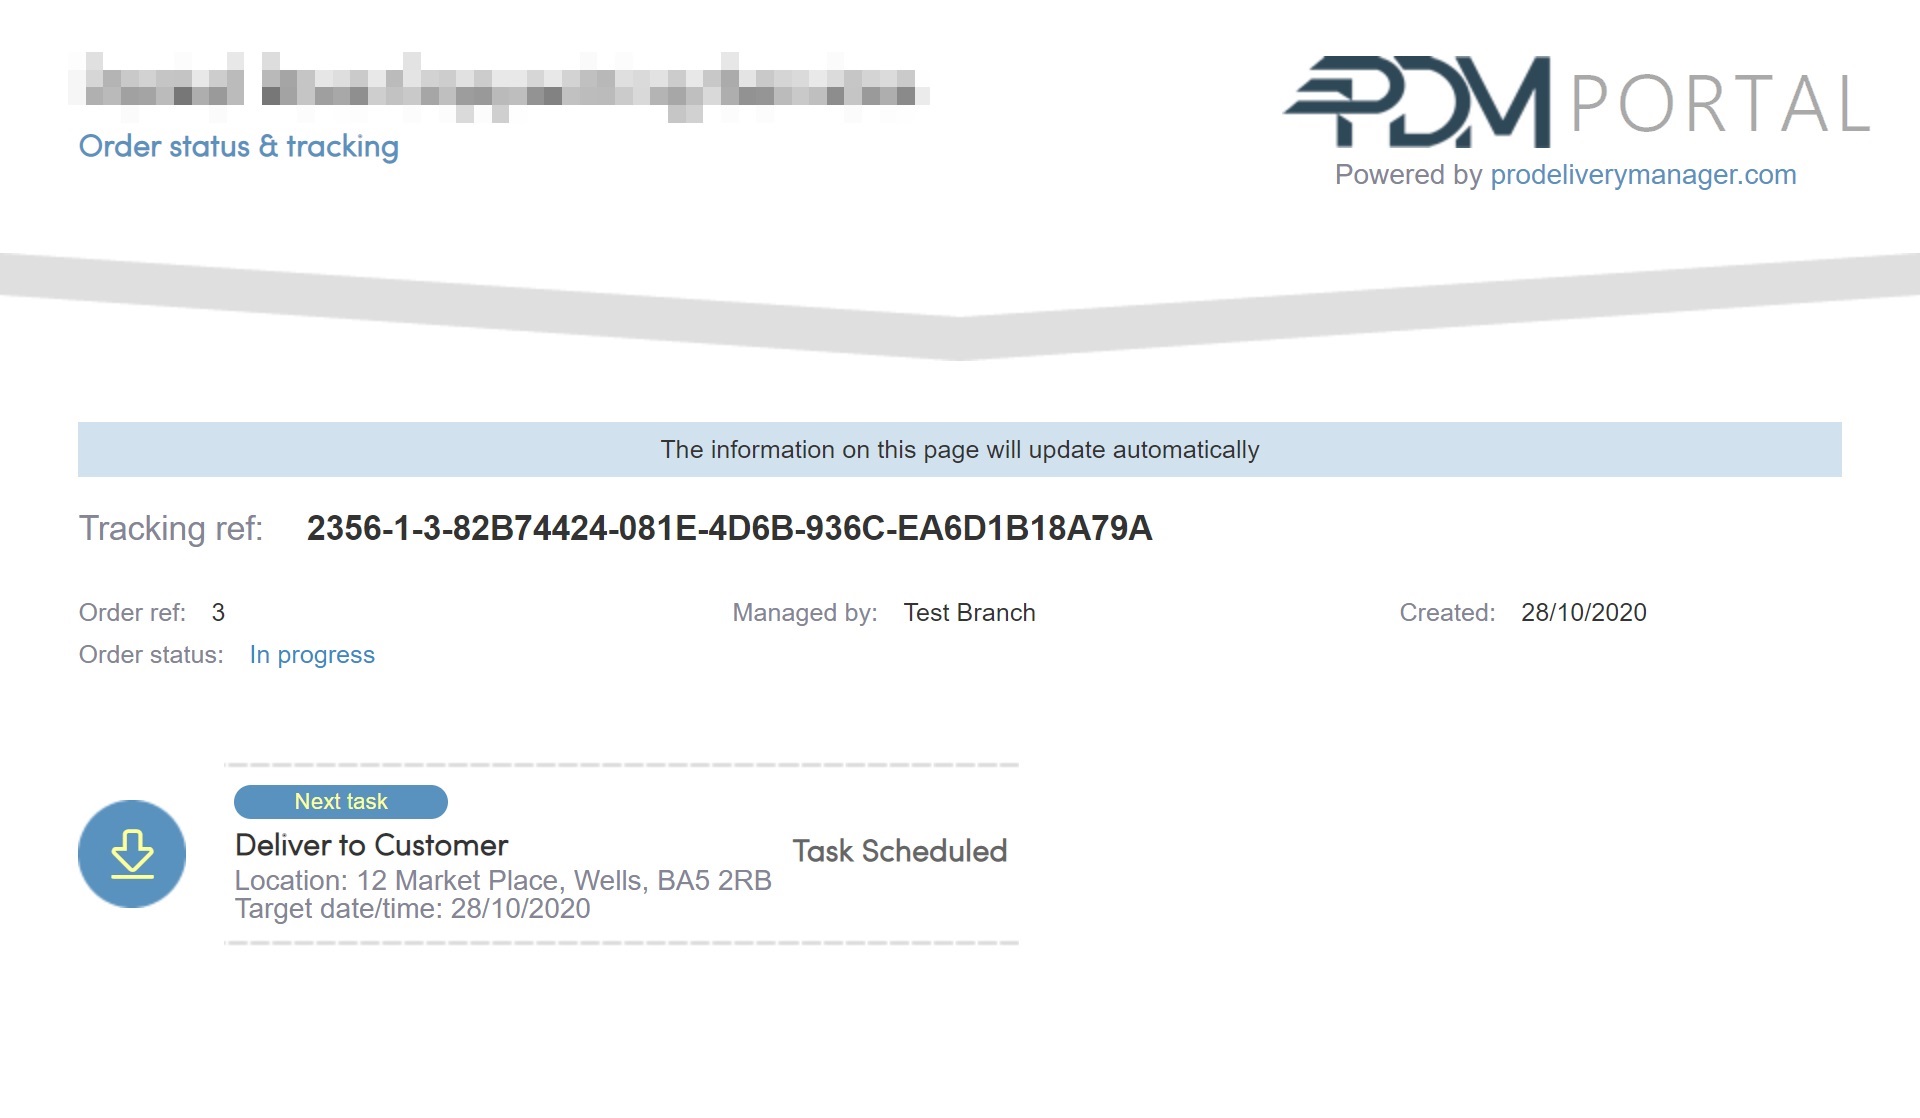
Clicking on ‘PDM Portal’ will open up the PDM Portal web page for this order in a new window.
Here the current status of the order and tracking information will be shown.
Note: The order ETA will only be shown once the task has been added to a route and the route has been started.
To use PDM to create labels based on the order information, click Print labels....
This will bring up the Label configuration menu, where you can set the label properties, including the information that is to be included on the label.
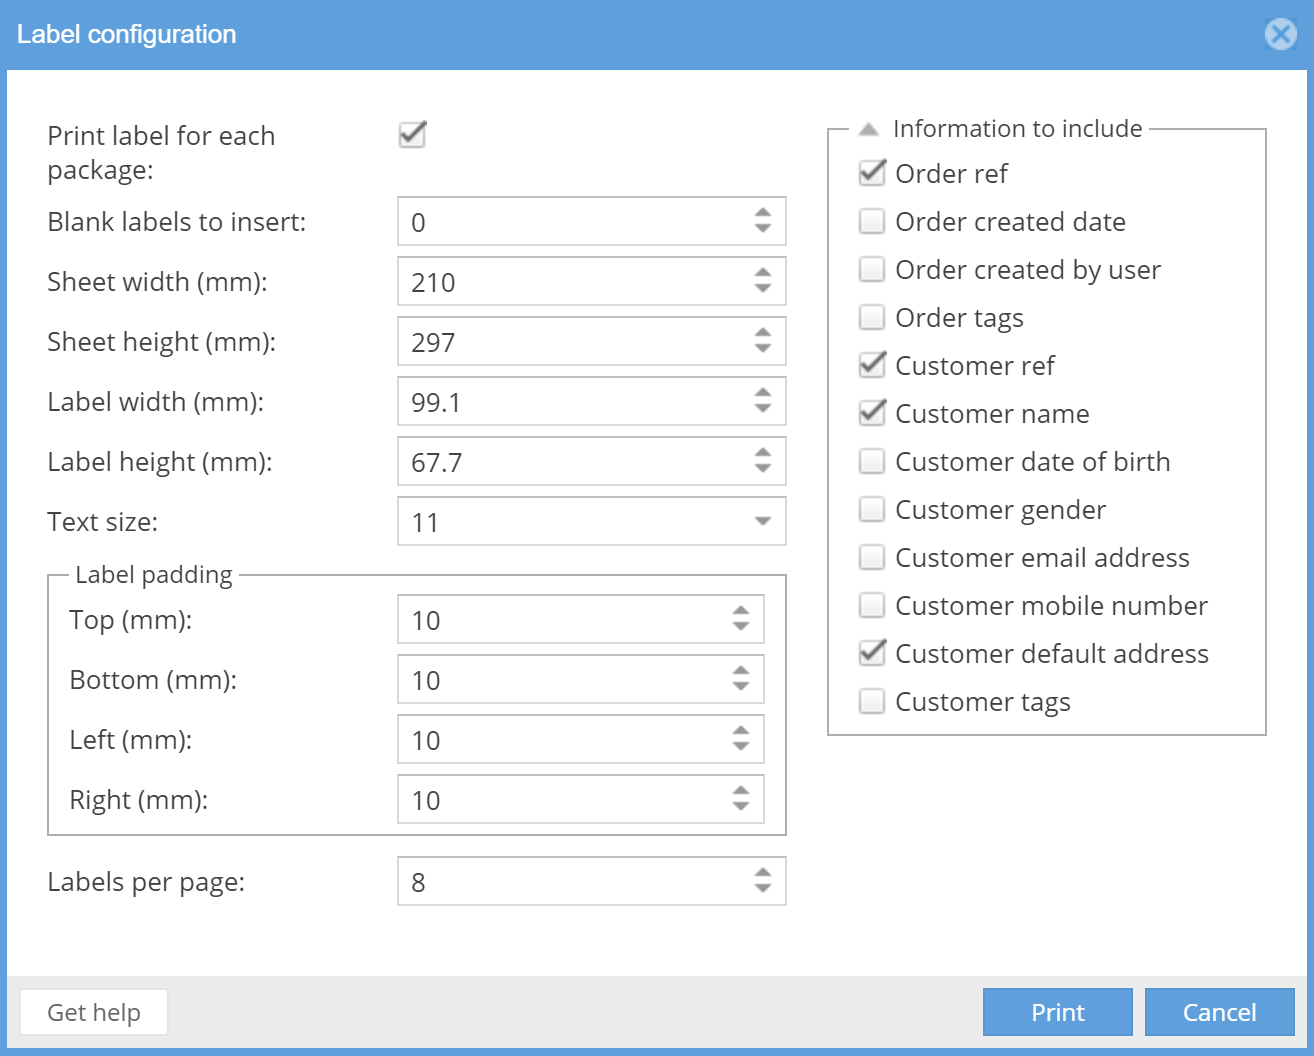
Click Print to confirm the printer and settings, then go ahead and print the labels.
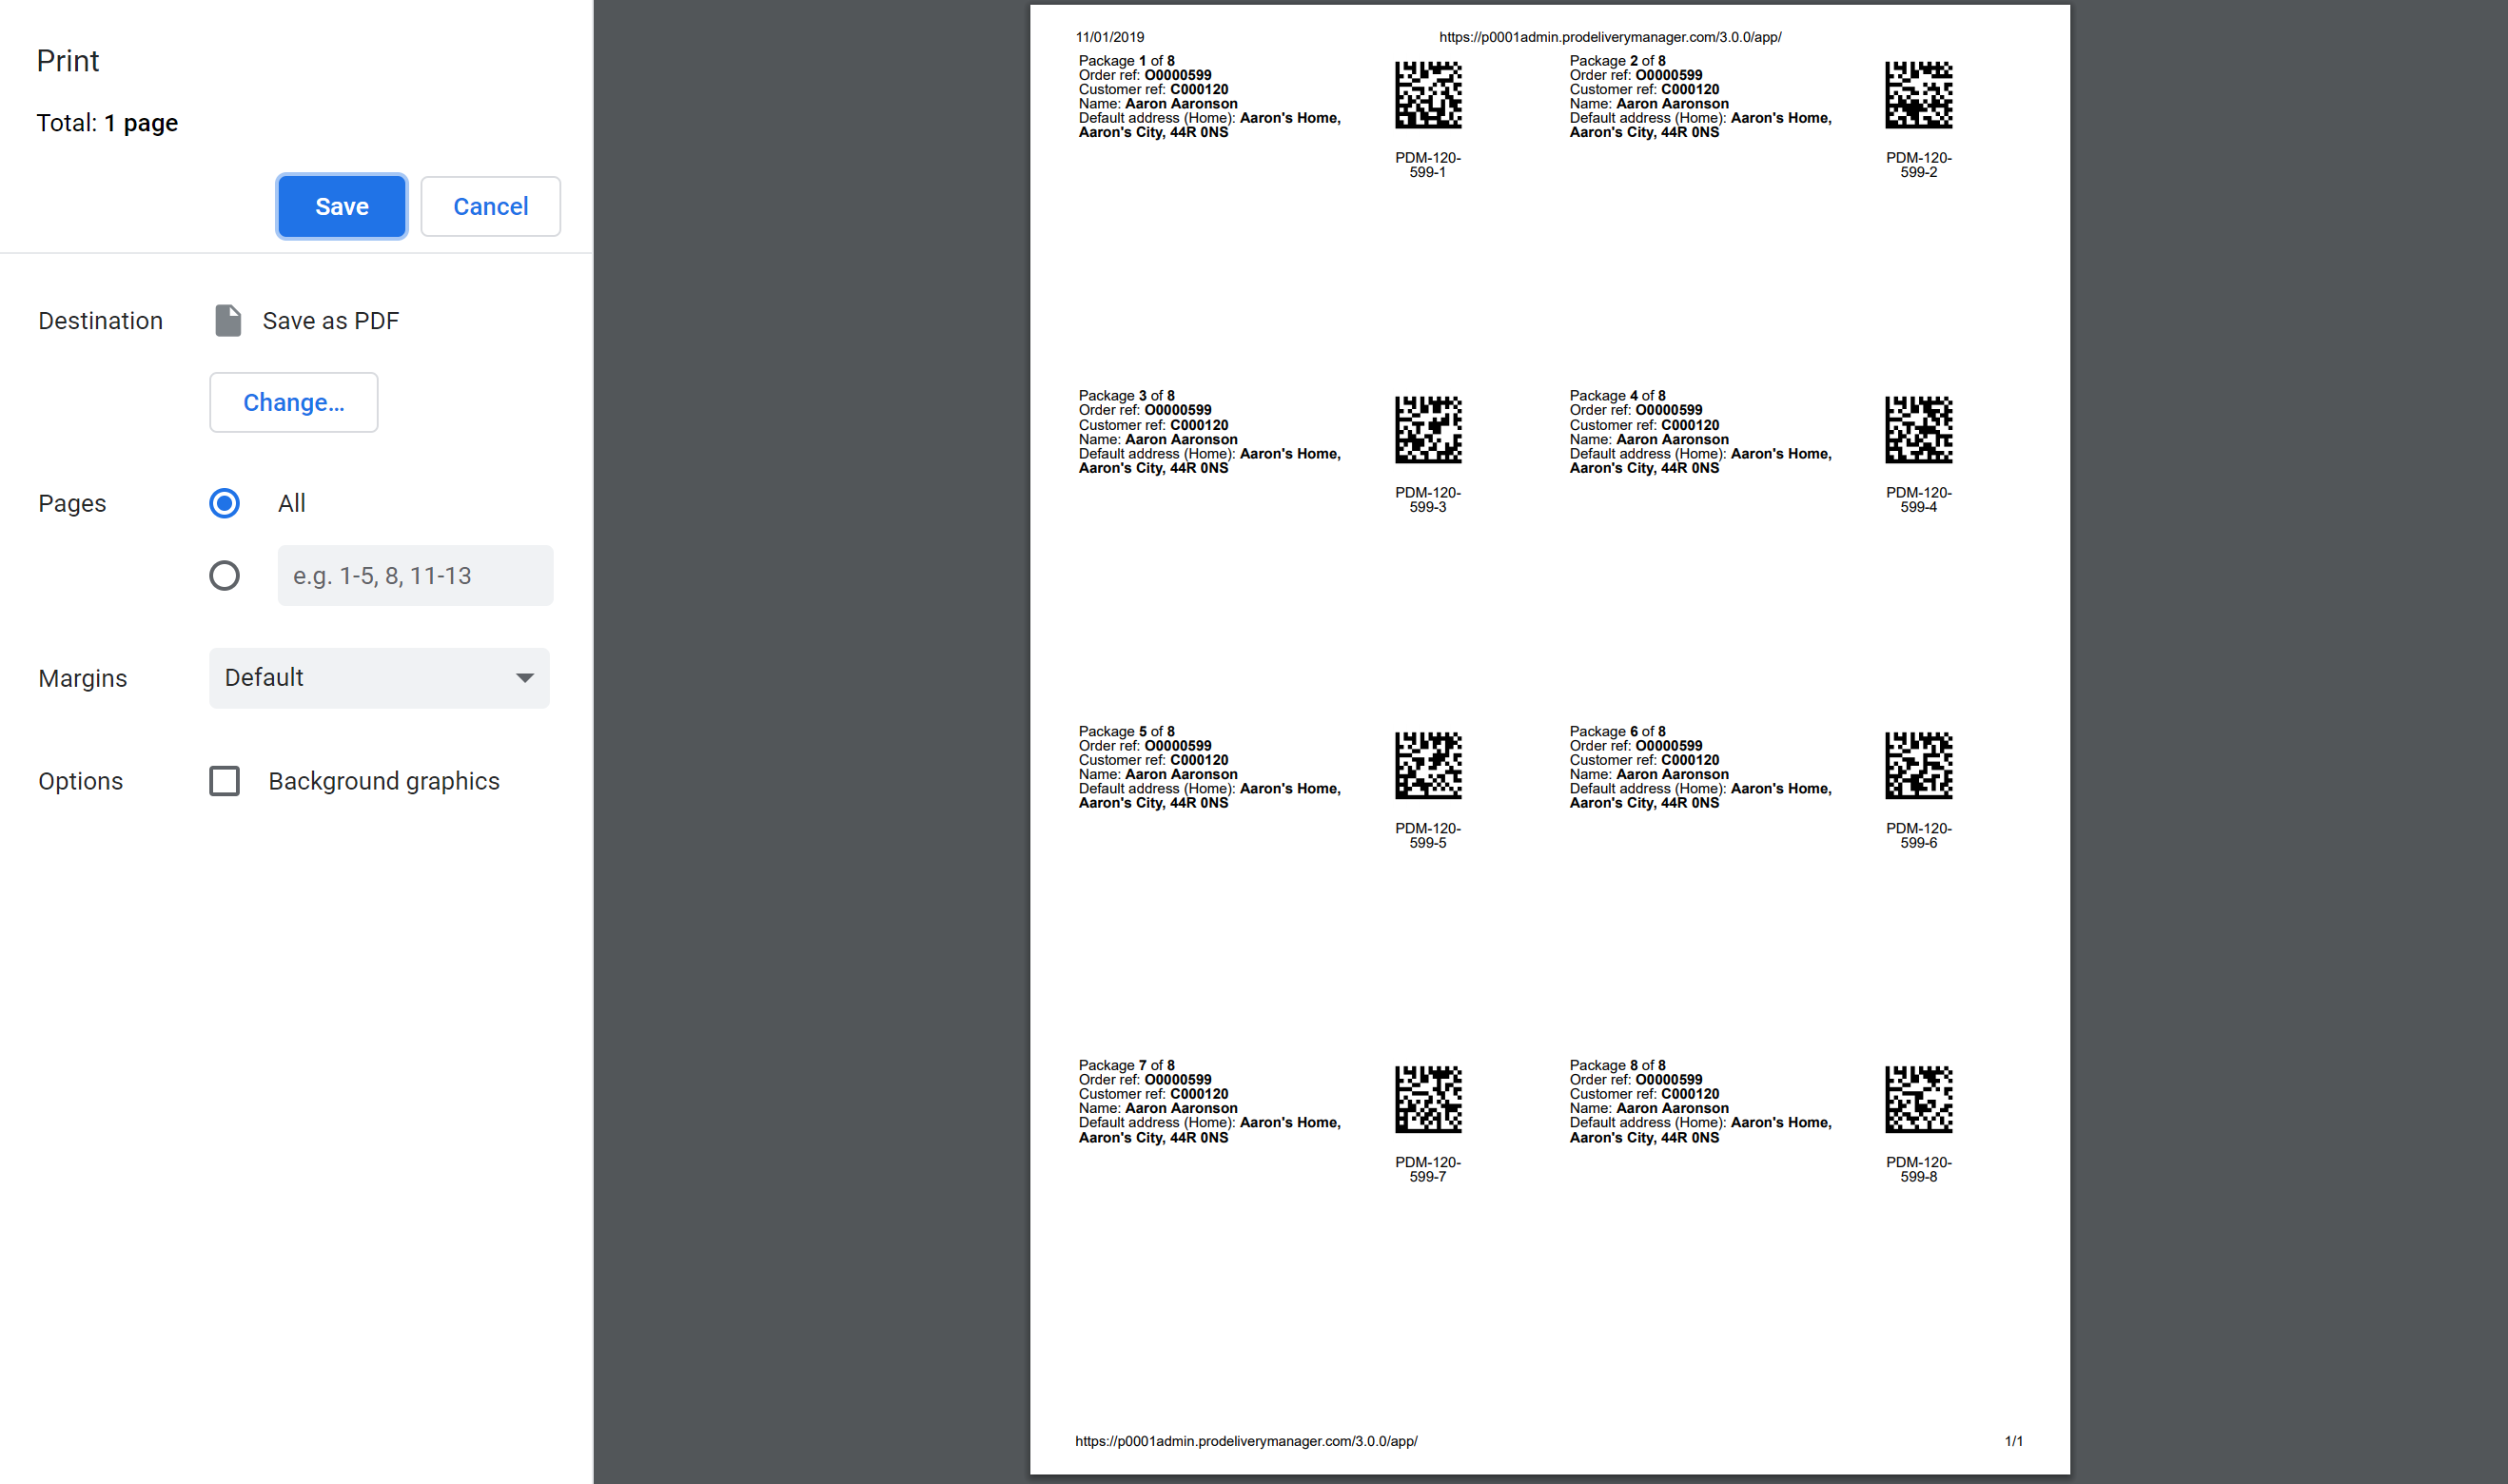
Note: there is currently no facility to print labels that are related to a specific task in an order, there are only labels for the order itself. This is because target dates are related to tasks and not orders. However, adding task-related label printing as an enhancement is pending future development.